“All travel destinations coming soon! Stay tuned!”


By:
If you’re an iPhone user who enjoys the portability of an eSIM, you’ve undoubtedly experimented with moving your mobile plan to a different phone. However, a notification stating that eSIM transfer is not supported appears!
Don’t worry. When attempting to transfer eSIM to a new iPhone, a lot of iPhone customers encounter this bothersome issue.
Simple activation faults, compatibility problems, or software defects are frequently the source of problems. But don’t panic; you can get the eSIM to function on your new iPhone by following a few troubleshooting steps. We’ll get into the specifics of why the eSIM transfer fails and how to resolve it in this post.
Are you prepared to take on the eSIM porting issue once and for all? Get going!
Related posts:
Attempting to move an eSIM to a new iPhone may present some difficulties. Outdated iOS is frequently the root cause of these issues, making them a frequent concern. Unstable Wi-Fi, sluggish iPhone Internet, and troubleshooting Bluetooth connections can also cause issues for customers. Determining and diagnosing these issues is crucial. The following are potential causes of an unsuccessful eSIM transfer:
There are equivalent remedies, even if these issues might present challenges. Now let’s explore some solutions for these typical issues.
There are a few things you must put in place to have a smooth experience with your new iPhone.
Note:
Now that we have identified the root causes of this situation, let’s take a closer look at the potential solutions. To address the difficulty of moving eSIM to a new iPhone, we have painstakingly developed useful and efficient alternatives. Come along as we examine six different strategies meant to deal with this complicated issue in its entirety.
Step 1: Navigate to “Settings” and choose “Face ID/Touch ID & Passcode” to confirm that your iPhone has a passcode.
Step 2: Scroll down to your Control Panel and check the status of “Bluetooth” and “Wi-Fi”; activate them if they are not already enabled.
Step 3: Throughout the transfer, make sure that both iPhones are unlocked.
Step 4: Maintain close proximity between the two iPhones.
Many people find that doing these basic tests solves the problem. The proximity of the devices is very important since it increases transmission rates. It’s worth mentioning that if the iPhone lacks a password, the transfer will fail. As a result, a password must be set up, and maintaining the smooth functioning of the transfer process demands the activation of Wi-Fi and Bluetooth.
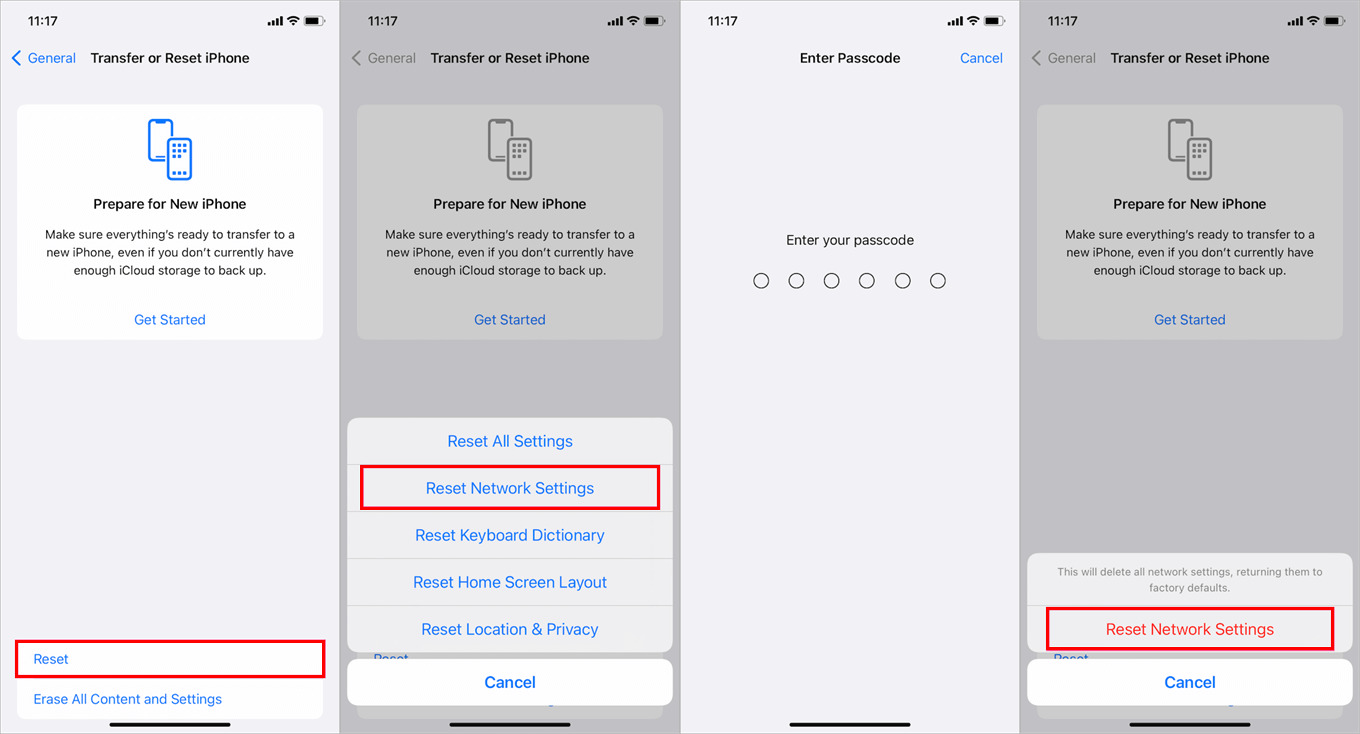
Step 1: Go to “Settings” and select “General.”
Step 2: Locate the “Transfer or Reset iPhone” settings.
Step 3: Tap on “Reset,” then select “Reset Network Settings.”
Step 4: Enter the passcode when prompted.
Step 5: Confirm your decision by clicking “Reset Network Settings.”
Keep in mind that you will need to adjust your Bluetooth and Wi-Fi settings after conducting this reset. This step, however, is likely to address the problem if it arises from network configuration difficulties since it efficiently clears any accumulated cache that may be impeding data delivery.
Resetting the iPhone to its factory defaults is one of the more extreme methods to fix this issue. Before continuing, though, it’s crucial to prioritise data backup because a reset runs the danger of erasing data.
Step 1: Select a reliable data transfer tool
Choose a trustworthy data transfer solution that works with both your source and target iPhones. AnyTrans, iMazing, and EaseUS MobiMover are a few examples.
Step 2: Download and run the Data Transfer Tool
Download and install the data transfer tool of your choice on your computer. Launch the program when it has been installed.
Step 3: Connect your iPhone to the computer
Connect your source iPhone and target iPhone to the computer using the matching USB cord. Check that the data transfer tool recognises the devices.
Step 4: Choose transfer mode
Choose the best transfer mode for your needs. Most tools include choices such as “Switch from phone to phone” or something like that. To begin the transfer, select the relevant mode.
Step 5: Select the data to be transferred
Choose the type of data to be transferred from the source iPhone to the destination iPhone. This includes contacts, messages, images, videos, applications, and so on.
Step 6: Begin the transfer procedure
Begin the transfer procedure when you’ve picked the desired data. The specified material will be copied from the source iPhone to the target iPhone via the data transfer utility.
Step 7: Monitor and double-check the transfer
The tool’s UI allows you to monitor transfer progress. You may be notified after the transfer is complete. Check the data sent on the destination iPhone to check that everything was correctly copied.
Step 8: Disconnect your iPhone
When the transmission is complete, carefully remove both iPhones from the computer.
Using a reputable data transfer programme streamlines the process of transferring data from one iPhone to another, assuring a smooth transition with no chance of data loss. Remember to follow the tool’s particular instructions for the most accurate and efficient data transmission.
After successfully backing up your data to your PC with the Data Transfer Tool, proceed with the iPhone reset:
Step 1: Navigate to “Settings” on your iPhone.
Step 2: Tap on “General” settings.
Step 3: Scroll down and locate “Transfer or Reset iPhone.”
Step 4: Choose “Erase All Content and Settings.”
Step 5: Confirm the action when prompted.
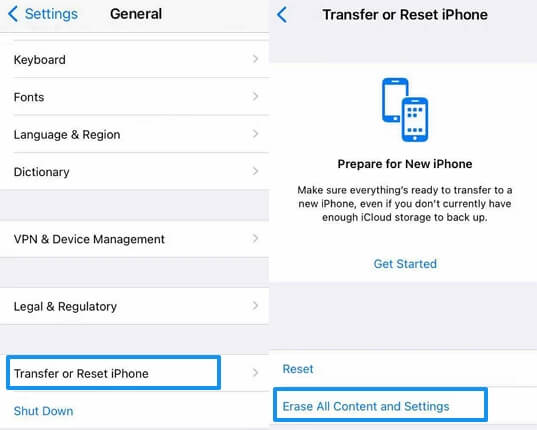
This process resets all data on the iPhone. Subsequently, you can easily restore your data using the Data Transfer Tool. Keep in mind that this comprehensive reset addresses the mentioned issues. However, it may necessitate an iOS update afterwards. Once the iPhone is reset, attempt to transfer the eSIM data to your new iPhone.
One easy way to reset background processes and critical services needed for eSIM transfer on an iPhone is to force restart the device. Take these actions:
Step 1: Switch off your iPhone.
Step 2: Press and release “Volume up.”
Step 3: Grind and let go of “Volume down.”
Step 4: Hold down “Side/Power” until you see the Apple logo.
Hold off until the force recommences. Next, attempt to switch to eSIM to verify its efficacy.

An old iOS version is a typical source of eSIM transfer problems on iPhones. The solution is simple: upgrade your iOS to the current version. Here’s an easy approach to checking for and upgrading iOS:
Step 1: Navigate to “Settings.”
Step 2: Select “General.”
Step 3: Navigate to “Software Update.”
Step 4: Select “Download and Install.”
Depending on your internet speed and download size, the procedure might take a few minutes. If the eSIM transfer problem persists, you’ll know in about 15-20 minutes.
Your only options are to get in touch with your carrier or ask Apple Support for help if the eSIM transfer problem doesn’t go away. Some problems could be complex defects that can’t be fixed right away, and Apple developers might have the knowledge to fix them. To get in touch with Apple Support:
Step 1: Go to “Apple Support” to get in touch.
Step 2: Choose your product—an iPhone, in this case.
Step 3: Select a problem from the inventory.
Step 4: As an alternative, go to the area labeled “How would you like to get help?”
Step 5: Select the Phone Call or Chat.
The conversation you have with Apple Support and your provider will determine the resolution. Since the problem is so common, it is best to seek expert help if other approaches don’t work.
Fix the eSIM transfer problem and turn on the eSIM on your new iPhone.
In summary, having issues with your iPhone’s eSIM transfer might be annoying, but you can avoid them by being prepared with the necessary information and troubleshooting techniques. Avoid letting difficulties with eSIM transfers prevent you from using your iPhone in a smooth manner.
Remember to get in touch with your carrier or Apple Support if you need assistance.
For an iPhone experience without hassles, check out options with Esimwise right now!

Instant mobile data for 150+ countries. Fast. Reliable. No sim required. No lock-in plans.


March 22, 2024
eSIM Reviews 

March 21, 2024
eSIM Reviews


March 20, 2024
eSIM Reviews
Total: USD $0