Transferring Google Fi eSIM to a new phone is like “moving to a new home” for your network service – just move your “digital belongings” to your new home without disassembling or changing anything. However, not everyone can do this smoothly and quickly. If you are also facing this difficult situation, scroll down the article, you can definitely find how to transfer google fi eSIM to a new phone effectively. All will be answered in detail in the following article.
Related posts:
- How to move eSIM from one phone to another?
- How to transfer eSIM from Android to iPhone?
- How to transfer eSIM from one iphone to another?
Can I transfer google fi eSIM to a new phone?
Yes. You can transfer google fi eSIM to a new phone. Due to this unique nature, transferring an eSIM from one device to another can be complicated. However, you can convert eSIM to a new device through the following methods:
- Online transfer: Carriers offer mobile apps or websites that allow users to transfer eSIM from one device to another. By visiting the respective app or website, you can follow the instructions and provide the necessary information to transfer the eSIM.
- In-store transfer: Carriers also offer eSIM transfer services at their exchange stores. You can come to the store and the staff will assist with the process of converting the eSIM to the new device.
For maximum convenience, you can perform the simple steps below at home!
What to do before you transfer Google fi eSIM to a new phone?

With Google Fi eSIM, users can activate and use Google Fi mobile network services on compatible devices without having to use a physical SIM card – extremely flexible and convenient. However, you need to keep in mind the following points when transferring Google Fi eSIM to a new phone.
Device unlock
In principle, you won’t be able to transfer an eSIM to a device locked to another network. You must unlock the device you are transferring the eSIM to. Contact your service provider to have your device unlocked in case it is network locked. Make sure your device meets the requirements for free unlocking.
eSIM can only be used on a single device. When transferring an eSIM to a new device, the eSIM on the old device will no longer work and you will need to use the new eSIM on the new device.
Check device compatibility
Not all devices support eSIM. Before you transfer google fi eSIM to a new phone, check if your new device is compatible with eSIM or not? Some devices that support eSIM include:
- Apple: iPhone 11, XS, XR, SE (2020),…
- Google: Pixel 2 (if bought with Fi service), Pixel 3a (excluding phones bought with Verizon service or in Japan), Pixel 3 (if bought with Fi service), Pixel 4 and later (excluding models bought from Verizon),…
- Samsung: Galaxy S21, S22, and S23, Galaxy Note20, Galaxy Flip 3, Galaxy Z Flip 4 and Fold 4,…
- Motorola: Moto G Stylus 5G (2023), Razr Plus,…
Please read more here to know exactly whether your device supports google fi eSIM transfer or not.
Transfer Google Fi eSIM to a new Android phone
Actually, you cannot complete the google fi eSIM transfer process from Android device to another Android device. But surprisingly, you can download & install the same eSIM account from old Android device to new Android device. Certainly, here are five steps to transfer your Google Fi eSIM to a new Android phone:
Step 1: Backup and prepare
Before starting the transfer process, ensure your new Android phone is compatible with Google Fi and is activated. Also, back up any essential data from your current phone.
Step 2: Install Google Fi app
Download and install the Google Fi app on your new Android phone if it’s not pre-installed. Sign in using the Google account associated with your Google Fi service.
Step 3: Transfer Google Fi eSIM to new Android phone
- On your new phone, open the Google Fi app
- Look for an option related to transferring your service to a new device or activating (Navigate to the “Account” or “Settings” section within the app).
- Follow the on-screen prompts to initiate the transfer of your eSIM to the new device.
Step 4: Activate process
After initiating the transfer, the app will guide you through the activation process on your new Android phone. Follow the steps provided to complete the activation.
Step 5: Test connectivity
Once activated, test your new Android phone to ensure it can make calls, send texts, and access data using the Google Fi service. This ensures that the transfer was successful and that all functionalities are working as expected.
Always refer to the specific instructions provided within the Google Fi app for the most accurate guidance tailored to your device and service. If you encounter any issues during the transfer process, Google Fi customer support is available to assist you further.

Transfer Google Fi eSIM to a new Iphone
Here’s a streamlined guide with five steps to transfer your Google Fi eSIM to a new iPhone:
Step 1: Prepare your new iPhone
Ensure your new iPhone is compatible with Google Fi and is ready for setup.
Go through the initial setup process until you reach the home screen.
Step 2: Download Google Fi app
- First, install the Google Fi app from the App Store on your new iPhone.
- Then, sign in using the Google account associated with your Google Fi service.
Step 3: Transfer Google Fi eSIM to new Iphone
- On your new iPhone, open the Google Fi app
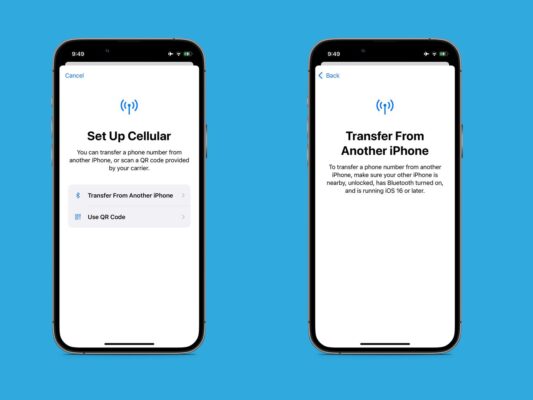
- Open Settings >> Cellular >> Add Cellular Plan and scan the QR code you are provided (Remember to go back to your iPhone to do these).
- Follow the on-screen prompts to initiate the transfer of your eSIM to the new iPhone, then tap “Add Cellular Plan”.
Step 4: Activate Google Fi
- The app will guide you through the activation process on your new iPhone. Follow the provided steps to complete the activation of Google Fi on the iPhone.
- Update the information in Settings >> Mobile networks >> Mobile data networks based on the information provided in the last section.
Step 5: Test connectivity
- After activation, test the connectivity on your new iPhone.
- Ensure it can make calls, send texts, and access data using the Google Fi service.
- This ensures that the transfer was successful and that all functionalities are working properly on the new device.
Always refer to the specific instructions provided within the Google Fi app for accurate guidance tailored to your device and service. If you encounter any issues during the transfer process, don’t hesitate to reach out to Google Fi support for further assistance.

FAQs
1. Can I Transfer Google Fi from Android to iPhone?
Yes, it is possible to transfer your Google Fi eSIM from an Android device to an iPhone or any iOS device that supports eSIM technology. Here’s how you can do it:
- Get the QR Code: Open the Google Fi app on your Android device. Navigate to the “Phone” tab, then “Manage Plan” and “Transfer”. Select “Transfer Fi to another device”. This will generate a QR code.
- Set up eSIM on iPhone: On your iPhone, go to Settings >> Cellular >> Add Cellular Plan. Scan the QR code that you obtained from your Android device using the iPhone’s camera.
- Follow Prompts: Your iPhone will recognize the QR code and initiate the setup process for the Google Fi eSIM. Follow the prompts to complete the setup.
- Activation: Once the setup is complete, your iPhone should be activated with Google Fi using the eSIM.
This process allows you to transfer your Google Fi service from an Android device to an iPhone seamlessly without needing to physically change SIM cards.
2. How long does it take to transfer Google Fi eSIM to a new phone?
The process of transferring Google Fi eSIM to a new phone is usually quick and can be completed within a few minutes, as long as you have all the necessary information and follow the instructions properly.
3. Does a Google Fi eSIM work internationally?
In theory, Fi eSIM can only be activated by US residents, however, all carrier plans include data, calls or texts in the US, Mexico and Canada . If you have the Unlimited Plus or Flex plan, you’ll get international data in over 200 locations, of course at no extra cost to you. These plans also get free texting outside North America (although calling actually costs $0.20 per minute).
4. Why isn’t eSIM transferring?
In case you cannot transfer google fi eSIM to a new phone, you may be having problems with the connection (Wi-Fi problem). If the connection is not stable, transferring the eSIM card will not be smooth. In other words, it’s not set up properly.
So, make sure your Wi-Fi and Internet networks are still working well. Also, remove the physical SIM from your device if you are not using it.
5. What happens if I forgot to transfer Google Fi eSIM to my new iPhone?
If you forget to transfer google fi eSIM to your new iPhone, it means that your new phone has not activated eSIM service from the previous one. Here’s what you can do:
Contact your carrier: They can help you deactivate the eSIM from your old device and activate it on your new iPhone. Before making changes, they may request verification of details from you.
Temporary solution: While waiting for eSIM activation, you can use your new iPhone with a physical SIM card to help you stay connected until your eSIM is activated.
Wrap up
It can be understood that transferring Google Fi eSIM to a new phone is like bringing a “phone number and network service combination” from the old device to the new device without interruption. This process helps you keep your phone number, plan, and Google Fi services without having to remove or replace the physical SIM. Hopefully, with our detailed instructions, you can transfer Google fi eSIM to your new phone quickly and easily. Try it out and give us feedback!
If you want to learn more about the latest technologies and useful guidelines, follow us for the latest updates.


